
Match your CG to the lens that captured the shot. Open Pipeline → Undistort and enable Automatic Undistort to analyze distortion after tracking, generate corrected media and export STMaps for compositing.
Correct the lens without changing the source
CreativeTrack keeps the solved camera focal length and estimates the selected distortion shape around that solve. It writes a corrected plate while preserving your source footage and camera track.
Automatic Undistort is off by default. Enabling it also enables Prepare Converted Media. That toggle stays locked while Automatic Undistort is on because this workflow requires a corrected plate.
Set the analysis range
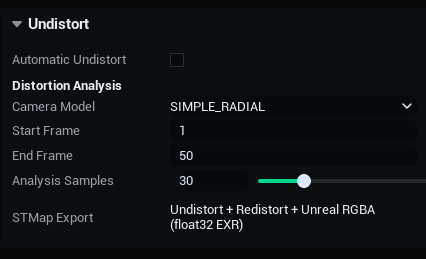
| Control | Default | Use |
|---|---|---|
| Camera Model | SIMPLE_RADIAL | Choose the lens-distortion shape. Start here for an unknown normal lens. |
| Start Frame | 1 | First analysis frame, from 1–1,000,000. |
| End Frame | 50 | Last analysis frame, from 1–1,000,000. Use a value at or after Start Frame. |
| Analysis Samples | 30 | 8–120 evenly sampled source-resolution frames. More samples can help difficult shots but take longer. |
| STMap Export | Read-only description | Undistort, Redistort and Unreal RGBA maps in float32 EXR. |
The lens Start/End fields select analysis samples; the Player’s In/Out marks select footage for processing. Lens-analysis numbering starts at 1, while the Player timeline starts at 0.
Match the lens model
For normal footage with barrel or pincushion distortion, start with SIMPLE_RADIAL. Use a fisheye model for genuine fisheye imagery. More parameters do not automatically produce a better calibration; the footage needs enough reliable detail to constrain them.
The lens model reference explains all available choices.
Generate and check the correction
- Load the footage and set its timing and processing range.
- Enable Automatic Undistort.
- Choose the Camera Model and analysis frame range.
- Start with 30 Analysis Samples, or adjust within the supported range.
- Check format, resolution and color settings in Media & Delivery.
- Run Track Shot, then compare the corrected plate with the camera and scene.
Tracking and scene export can finish even if lens analysis fails or its estimate is rejected. In that case the plate may remain uncorrected. Check the Undistort status, Job Log, corrected media and STMaps before relying on the result.
Inspect straight lines, proportions and image edges for remaining curvature or excessive warping. If the fit is poor, check the model and analysis footage before adding complexity.
Use STMaps in compositing
A successful lens export includes separate full-float undistort and redistort maps, plus a combined Unreal RGBA STMap. The combined map stores undistortion in RG and redistortion in BA.
Choose the map for the operation you need. A corrected plate has already been undistorted, so avoid applying that correction twice. During import, CreativeTrack uses the generated Unreal map and Lens File to configure the camera’s lens setup.
For a separate conversion-only export, switch off Automatic Undistort and Prepare Converted Media, then use Convert Selected Media.
